Building Odyssey

Anchor Locker
Wednesday, November 5, 2014
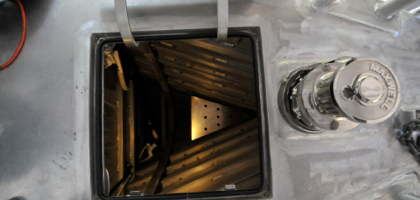
The Dix 43 has a roomy anchor locker / forepeak. Robert at Alumar suggested during our refinement of his cutting files that the watertight bulkhead be moved after by about 8”, which we agreed to. This turned out to be a very useful bit of extra room as it makes the locker much more user friendly.
There are some basic guidelines for storing anchor chain on any boat and some specific to an alloy hull. 200’ ( a half drum) of 3/8” G4 galvanized chain weighs 306 lbs . This weight wants to be kept as low as possible, and as far aft as practical. Now I’ve heard of guys putting their chain underneath the berth in the forward cabin, but getting it there smoothly seemed problematic, as well as dealing with the mess and smell. We opted to keep it all in the locker.
The fall of the chain into the storage bin should be sufficient to allow the chain to smoothly mound in a conical shape.Experimentation led to the conclusion that more fall is better, with a minimum of about 18”.
On an alloy boat the galvanized chain must not be stored against the hull, or in an alloy bin for galvanic reasons. There is going to be a certain amount of muck coming in on the chain despite best efforts to hose it clean during retrieval. At minimum it will be wet and salty, so a provision must be made for draining the bin.
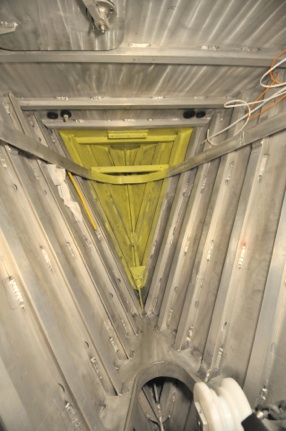
My initial ideas for the bin involved some sort of fabricated alloy bin with a liner of something (?) or epoxy coated plywood, neither of which would probably stand up to continued usage without repairs. And then the proverbial lightbulb started glowing in my little brain and I remembered the trug. Trugs are made from recycled tires, with wire reinforcing and are just about indestructible. Basically they are rubber bushel baskets made for gardening, construction and general carrying of loose stuff. And they are inexpensive! I ordered the Gorilla- extra -large and it fit the aft end of the locker perfectly, holding the 200’ of chain with room to spare.It’s circular shape would aid in a smooth cone, too.
Now the issue was getting the chain from the windlass on the deck in front of the locker hatch into the trug. Experimentation showed that my preconceived ideas about how chain moves were in need of revision. The first thought was to build a sliding board with a surface of slippery UHMW plastic. But getting the fall into the trug high enough meant that the slide didn’t have enough down angle for the chain to move, plus the friction was high. To reduce the friction I decided to that rollers might be better, and since I had made a spare anchor roller, I quickly built a bracket and began more experiments, again thinking that there need to be some initial fall from the windlass and then a slope down to the bin. Wrong!. A second roller placed on the watertight bulkhead centered above the bin and actually higher than the forward roller turned out to do the trick. It’s the weight of chain falling vertically into the bin that keeps it all in tension, so the initial fall from the windlass doesn’t need to be far.
Thirty days in the hole.
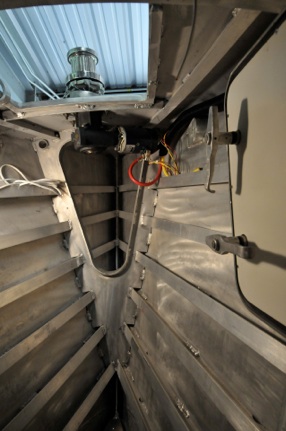

Looking forward through the hatch at the foot of the berth in the forward cabin.
The inside of the hull below the chain bin was sandblasted (oh, fun) and primed with Pettit AlumaProtect prior to 4 coats of their Protect Epoxy Barrier coat.
The chain runs aft across the hatch opening, which was troubling. However It is very easy to simple pull the chain to the side where a simple hook will hold it in place. We’ll just have to remember to unhook it before deploying the anchor. The UHMW rollers will fit the bow roller assembly should the need arise.
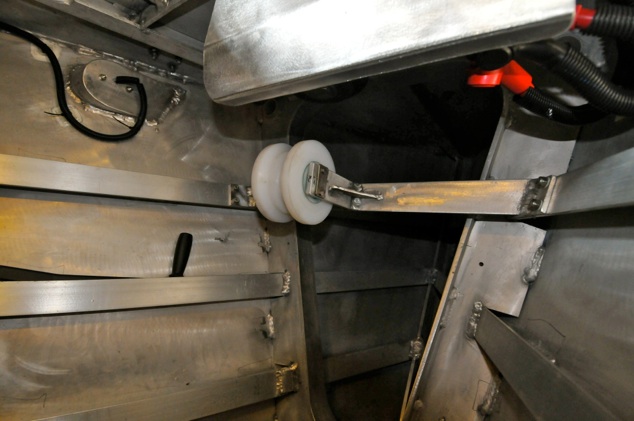
The forward roller and bracket. I made all of this assembly removable, for the obvious reason that just because it works in dry dock doesn’t mean it will work in use at sea. Also visible in the upper part of the picture is a guard I installed to protect the windlass motor, both from spray and from physical impacts. I’m pleased with both the access to the windlass and its relatively out of the way location. The solenoid is just aft of the WT bulkhead in a locker on the Sb side...
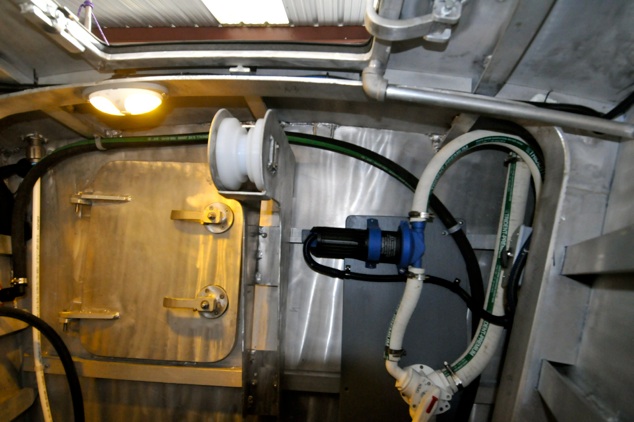
The aft roller is mounted to the angles which reinforce the WTBH. And then there’s the plumbing: Just aft of the WTBH is the gray water tank. I have plumbed a Whale diaphragm pump to allow it to pump the gray water tank overboard (in areas that allow this) or, with the correct valve selection, to allow it to act as a bilge pump and clear the water from below the chain bin. Additionally there is a deck fitting that will allow suctioning the grey water at the pumpout dock. The plumbing took as long to do as the chain handling system.
Finally, to the left is a photo of the trug itself, bolted to a removable sole panel.There are 3 drain holes in it;s bottom. Also note the ring attached to the angle above the trug. This is for tying the chain’s bitter end to. I’m glad to get this project done in the cooler autumn weather, as working in “the hole” can get stuffy at the best of times. Now for some work in the lazarette...


